

Are you new to using braiding hair, or do you usually spend 2 to 3 hours getting your hair braided at the salon or doing it yourself for long-lasting, semi-permanent braids—only to take them down and rebraid them months later? Sometimes, you might even have to cut them off shortly after installation due to unexpected needs, which can feel like such a waste.
Research shows that our scalp needs breaks between rebraiding sessions. So why not explore more creative ways to use your human braiding hair beyond traditional braids? Maximize the braiding hair you already own and unlock stunning and flexible styles!
DIY Crochet Hair Wefts
Tools you may need:
- Braiding human hair(twice the length of a ponytail)
- Hair string/rope
- Hair straightener
- Chair
Step-by-Step Guide:
- Turn the chair upside down so the four legs are facing up. Tie the string between two chair legs to create a base for braiding.
- Divide your braiding hair into small, equal sections.
- Hand-crochet the hair onto the string:
- Take a strand of hair and fold it in half.
- Place the looped side over the string.
- Pull the loose ends through the loop and tighten to secure.
Repeat this process until your hair weft reaches the desired width.
Tips:
The smaller the hair sections, the flatter and more natural your weft will be.
Lightly straighten the crocheted side with a hair straightener for a smoother finish.
DIY Wrap Around or Clip In Ponytail
Method 1: Wrap-Around Ponytail
Tools you may need:
Braiding human hair(twice the length of a ponytail)
Hair tie or elastic hair string
Bobby pins
Step by Step Guide:
- Cleanse, air dry, and lightly condition your braiding hair.
- Pull the hair tie through the middle of the braiding hair and knot it to create an easy-to-wrap ponytail.
- Wrap the hair around your natural ponytail or secure it with bobby pins for a firm hold.
Method 2: DIY Ponytail with Crochet Hair wefts
For a quicker method, you can skip making small strands or super-flat weft bonds.
- Instead of sectioning the braiding hair into small strands, use thicker sections to speed up the process.
- Follow the same crochet technique as the DIY hair wefts, but with larger sections to create a fuller ponytail faster.
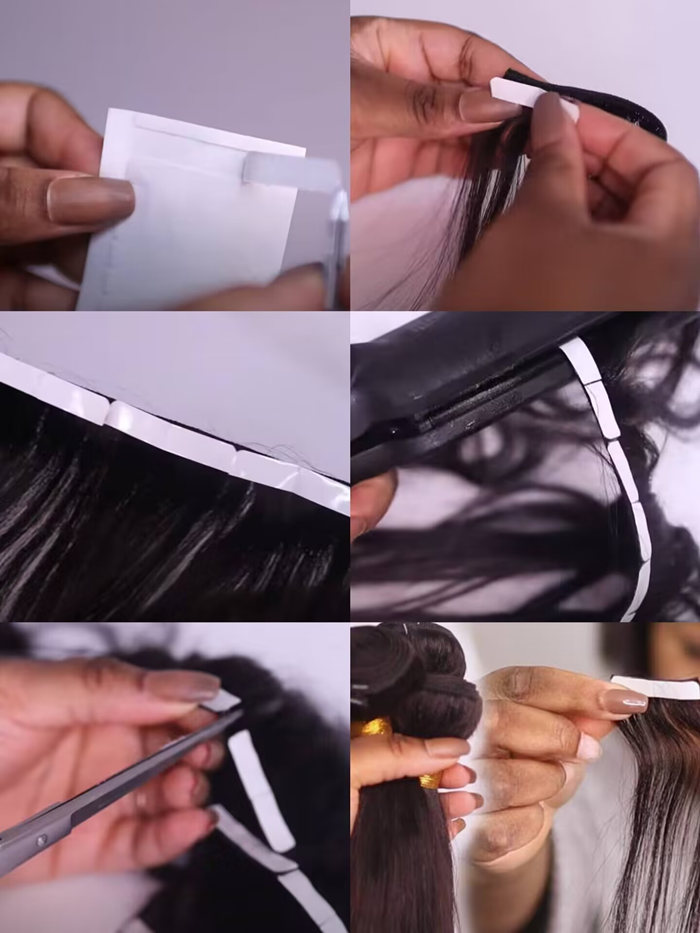
Diy Tape In Extensions
Method 1:Traditional Tape-In Method
Tools you may need:
- Measure tape
- comb
- Sealing tape
- Double side hair extension tape
- Scissors
- Adhesive
- Backing paper(optional)
- Heat straighter(optional)
Step by Step Guide:
- Secure the Surface:Use tillow tape to secure the backing paper onto your table to prevent any mess.
- Mark Tape Width:Mark the desired width of your tape-in extensions on the backing paper.
- Divide and Prep Hair:
- Divide your human braiding hair into equal sections.
- Spread the hair evenly within the marked area. If needed, lightly comb the hair to make it smoother.
- Apply Sealing Tape:Apply sealing tape about 1 inch away from the hair roots. Secure it firmly onto the backing paper.
- Apply Adhesive:Evenly apply liquid adhesive to the edges of the sealing tape. Use the back of the comb to spread the adhesive from the edges toward the roots to help the hair stick better.
- Dry the Adhesive:Wait until the adhesive is completely dry.
- Apply Double-Sided Tape:
- Align the double-sided hair extension tape with the glued hair, matching it to the sealing tape line. Press both sides onto the backing paper.
- Carefully remove the tape from the hair.
- Press for a Stronger Hold:Use the comb band to gently press the double-sided tape to ensure it sticks well to the hair roots.
- Cut and Trim:
- Use the ruler to mark the width of each tape-in extension on the double-sided tape (each piece should be about 4 cm).
- Peel the glued hair off the table and trim any excess hair that extends beyond the tape.
Method 2:DIY Tape ins Using Hair Wefts
- If you’re using the crochet method to create your hair wefts, simply apply double-sided hair extension tape to the finished wefts.
- Cut the wefts into smaller pieces, and then follow the same process as above to attach them to your natural hair.
DIY Clip In Bangs and Fill-Ins
Tools you may need:
- Snap-on hair extension or wig clips
- Scissors
- Measuring tape
- Needle and thread or mini glue gun
Step -by -Step Guide:
- Measure and Cut Hair Wefts:Measure and cut the hair wefts to your desired width for the bangs or fill-ins.
- Attach Clips to the Wefts:Secure the snap-on hair extension clips to the wefts. You can sew them in place using a needle and thread, or use a mini glue gun for a quicker option.
Tips:
Traditional clip-ins usually have one clip attached every two inches.
For a more secure hold on wider clip-ins or fill-ins (e.g., 3 inches), add 2 clips on each side to ensure a firmer fit.
DIY Removable Braided Headband
Tools you may need:
- Rubber band
- Scissors
- Elastic band
- Hanger
Step by Step Guide:
- Prepare the Hair:Place a rubber band in the middle of your braiding hair, loop it around, and pull the elastic band through.
- Set Up for Braiding:Secure the rubber band onto a hanger, or hook it onto a chair arm or similar surface to keep it steady while you braid.
- Start Braiding:Divide the hair into three equal sections and begin braiding until you reach the desired length for your headband.
- Secure the Ends:Tie the ends of the braid with a hair tie, then trim any excess hair.
- Finalize the Headband:Pull the elastic band at the root of the braid through the loop at the ends. Then, pull it all the way through until it’s snug.
Unlock more effortless hairstyles at this blog:10 Trending 4a Hair Extensions Styles To Revamp Your Look
Contact our CSR via [email protected] or check our home page CurlsQueen for more details.