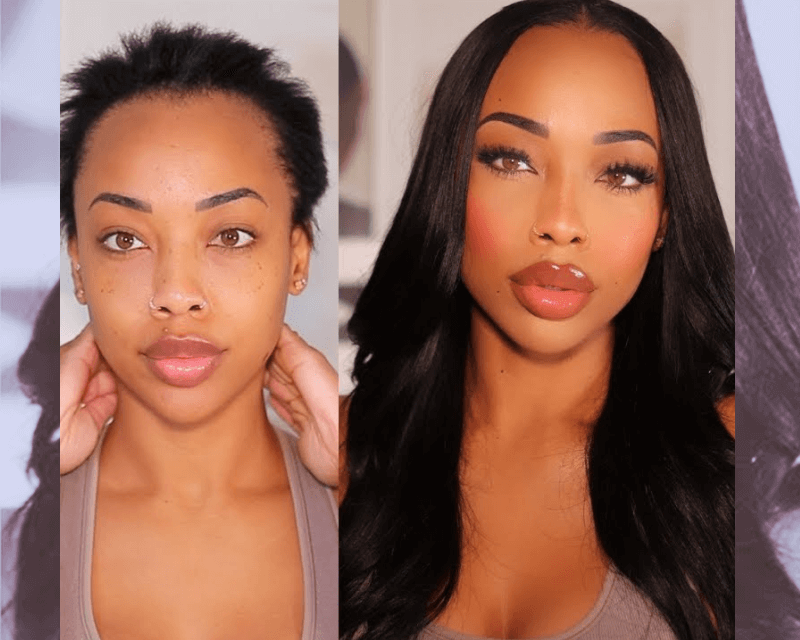
Pixie cuts are a stylish choice for women on the go who are looking to refresh their look or adopt a new style. However, for those dealing with thinning or receding hairlines, cutting hair might be a necessity for recovery. Whatever your situation, growing out a pixie cut can feel daunting yet thrilling. With the right choose and use of human hair extensios and wigs, you can successfully navigate this transition.
In this blog, delve into effective solutions and tips with BL to help you smoothly transition from a pixie cut to longer, fuller hair while maintaining a natural appearance.
Know Your Unique Hair Texture Before Selecting Hair Extensions or a Wig
Hair Volume:
Before diving into solutions,it’s essential to understand your hair. This knowledge will help you choose the right extensions or wigs that blend seamlessly with your natural locks.
Density and Evenness of Hair Growth:
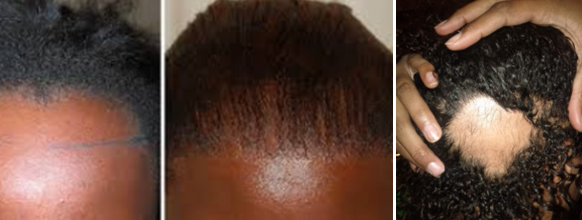
Evaluate the density and evenness of your hair growth.If certain areas are sparse, have bald patches, or are receding, consider solutions that can strategically enhance volume where needed to ensure a balanced look.
Hair Type and Texture:
Identify your hair type and texture—whether it’s fine,medium,coarse;
straight, wavy, or curly. This will guide you in selecting extensions or wigs that match your natural hair, creating a more cohesive appearance.
Color
Color Compatibility: Consider what shades complement your natural hair, face, and style better by looking over your album. Consider highlights or lowlights to create a blended look. For subtle contrast, opt for colors that are just a few shades lighter or darker.
Undertones: Consider the undertones of your hair (warm or cool) and select extensions with matching undertones to avoid clashing.
Check out other blogs to learn more tips for choosing different hair textures and color matching.
How to Blend Clip in Extensions with Short Hair?
Why Your Hair Extensions Don't Blend: Common Mistakes and Fixes
Know the Differences Between Main Types of Hair Extensions and Wigs
| Install Methods | Install Limitations on Natural Hair Length |
Wearing Cycles | Installation Time | |
| Clip in extensions |
Clip the extensions onto natural hair using the attached clips. | 3 inches | Temporary extensions allow to be put on and remove instantly. |
15-30 Minutes |
| Weft hair extensions | Sew the wefts onto natural hair, or use glue to attach extensions to hair. |
4-6 inches | Sew-in: 4-12 weeks Quick weave: 6-8 weeks |
1.5-2 hours |
| Microlink Beads weft hair extensions |
Install by threading small sections of natural hair through a bead along with a weft of hair. | 4 inches | 8-12 weeks | 1-2 hours |
| Microlink Itip hair extensions |
Install by attaching small, stick-like keratin-bonded pieces of hair to natural hair using a micro-link bead. | 4 inches | 8-12 weeks | 1.5-2 hours |
| Tape in hair extensions |
Install by sandwiching thin, small pieces of extensions between sections of your natural hair using adhesive tape. |
3-4 inches | 6-8 weeks | 1-2 hours |
Understanding the various types of hair extensions is crucial for making informed choices. Here are the most common types, including their installation times and skill requirements:
1. Clip in Extensions
Installation Method: Temporary extensions that clip into your hair.
Installation Time: Approximately 10-15 minutes for application.
Installation Skill Requirements: Very low; anyone can apply clip-ins without professional help.
Pros: Easy to apply and remove, perfect for occasional use.
Cons: Not ideal for long-term wear; can slip out if not secured properly.
2. Tape in Extensions
Install Method: Wefts of hair are attached to your natural hair with adhesive tape.
Installation Time: Typically takes about 30-60 minutes.
Installation Skill Requirements: Moderate; best applied by a professional for optimal results and longevity.
Pros: Flat and lightweight, providing a natural look; can last several weeks with proper care.
Cons: Requires professional installation and removal; not as reusable as other types.
3. Weave bundle Weft Hair Extensions

Install Method: Hair wefts are either sewn into braided sections of your natural hair or glued directly onto a protective weave cap.
Installation Time: Usually takes 1-3 hours, depending on the desired fullness.
Installation Skill Requirements: High; requires professional skills to prevent damage and ensure a secure fit.
Pros: Long-lasting and secure; suitable for various textures.
Cons: Can cause tension on the scalp if not done correctly.
4. Microlink Hair Extensions (Microlink I-Tip Hair Extensions and Micro Beads Weft Hair Extensions)
Install Method: These extensions use small beads or links to attach hair strands to your natural hair without glue or heat.
Installation Time: Takes about 2-4 hours.
Installation Skill Requirements: High; requires a skilled stylist for proper placement and to avoid damage.
Pros: Offers a natural look and allows for movement; suitable for various hair types.
Cons: Requires maintenance to avoid slippage; can be time-consuming to install.
5. Wigs
Recently, machine-made wigs have been selling better due to their affordability and consistent quality. These wigs typically come in several types, including lace front wigs, U-part wigs, and drawstring ponytail wigs, each offering unique benefits. With a wide range of colors and styles available, they cater to various preferences.
Install Method: Wigs with full hairpieces that cover the entire head.
Installation Time: Can be put on in about 5-10 minutes for ready-to-wear wigs; more time if customizing.
Installation Skill Requirements: Low to moderate; basic styling skills can enhance the look, but no professional help is needed for application.
Pros: Instant length and volume; versatile styling options.
Cons: Can be hot and uncomfortable for long wear; requires maintenance.
How to Choose Fitting Solutions to Lengthen and Add Volume to Your Pixie Cut
When choosing hair extensions, it's essential to consider both the time required for installation and the financial investment involved. Here's a breakdown of the financial costs associated with each main type of extension:
1. Considering Your Wearing Time and Frequency
Think about how often you plan to wear extensions or wigs. If you want a temporary change, clip-ins or wigs are ideal. For a more permanent solution, tape-ins or sew-ins may be better suited.
2. Considering the Time and Financial Investment
When aiming for a natural blend with a pixie cut, human hair extensions are the top recommendation due to their superior quality and realistic appearance. Extensions and wigs vary in costs and maintenance needs.so it's crucial to consider both the hair costs and installation costs. Here are the prices offered in the U.S.:
Clip in Extensions
Hair Cost: Typically ranges from $100 to $300 for high-quality human hair clip in extensions.
Installation Cost: Generally, no professional installation is needed; if desired, it can cost around $60 to $180.